TM 5-3895-373-34
A.
REMOVE - Continued.
2.
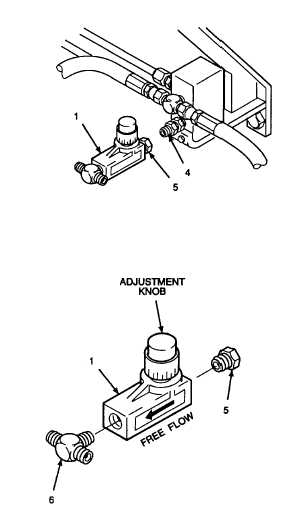
REMOVE SCREED TRAVEL LOCK VALVE.
Hydraulic
oil
can
be
moderately
flammable and can be an irritant to the
skin, eyes, and respiratory system.
Avoid
prolonged
exposure.
Eye
protection and rubber gloves must be
worn when working with hydraulic oil.
a.
Hold pipe nipple (4) with a wrench. Remove
screed travel lock valve (1) by removing pipe
reducer (5). Drain any excess hydraulic oil into
drip pan. Cap nipple with protective cap.
b.
Dispose of hydraulic oil in drip pan in accordance
with local procedures.
c.
Remove pipe reducer (5) and tee (6) from
screed travel lock valve (1).
B.
INSTALL.
1.
INSTALL SCREED TRAVEL LOCK VALVE.
a.
Use cleaning cloth to wipe residue from threads
of pipe reducer (5), tee (6), and pipe nipple (4).
Pipe sealant can cause eye damage or
skin irritation. Wash after skin contact.
Wear
safety
goggles/glasses
when
using. Avoid contact with eyes or skin.
If sealant contacts eyes, flush eyes with
water
and
get
immediate
medical
attention.
Ensure fittings are installed correctly into
screed travel lock valve. If fittings are
installed incorrectly into screed travel
lock valve, screed. may drop suddenly,
causing serious injury or death.
b.
Apply pipe sealant to male threads of pipe
reducer (5) and install reducer onto screed travel
lock valve (1) at end closest to adjustment knob.
Tighten reducer.
c.
Apply pipe sealant to pipe threads of tee (6) and
install tee onto screed travel lock valve (1) at end
closest to arrow (free flow end). Tighten tee so
that tee is aligned as shown in illustration
d.
Apply pipe sealant to threads of pipe nipple (4).
e.
Install screed travel lock valve (1) onto pipe
nipple (4). Tighten pipe reducer (5) and position
screed travel lock valve with adjustment knob on
top
GO TO NEXT PAGE
2-797