TM 5-3895-373-34
2.56
REPLACE SCREED VIBRATION CONTROL VALVE - Continued
B.
INSTALL Continued.
2.
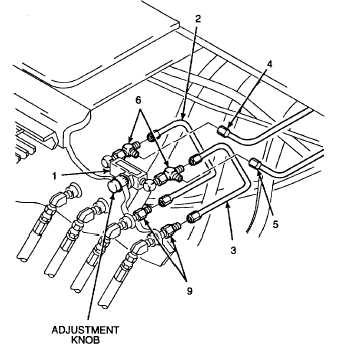
INSTALL SCREED VIBRATION CONTROL VALVE.
a.
Use cleaning cloth to wipe residue from threads
of exposed straight adapters (9).
Hydraulic fitting sealant can cause eye
damage or skin irritation. Wash after
skin
contact.
Wear
safety
goggles/glasses when using. Avoid
contact with eyes or skin. If sealant
contacts eyes, flush eyes with water and
get immediate medical attention.
b.
Apply hydraulic fitting sealant to threads of tees
(6) and straight adapters (9).
NOTE
Ensure free flow arrow is on top of
screed vibration control valve. TION c.
Install screed vibration control valve (1)
through rear top right access door.
Place adjustment knob in hole in rear
bulkhead. Ensure free flow arrow is on
top of control valve.
d.
Connect tubes (4 and 5). Do not tighten tubes at
this time.
e.
Install tubes (2 and 3) between tees (6) and
straight and adapters (9). Do not tighten tubes
at this time.
The screed vibration control valve is
held into position only by hydraulic
tubes. Hold the control valve securely in
place when tightening tubes to prevent
bending the hydraulic tubes.
f.
Ensure screed vibration control valve (1) is
properly aligned in the rear bulkhead and no
stress is being placed on tubes (4 and 5) and
tubes (2 and 3).
g.
Hold screed vibration control valve (1) in position
and tighten tubes (4 and 5) and tubes (2 and 3).
NOTE
FOLLOW-ON-TASK: Close rear top right access door per TM 5-3895-373-10.
END OF TASK
2-794