TM 5-3895-373-20
A.
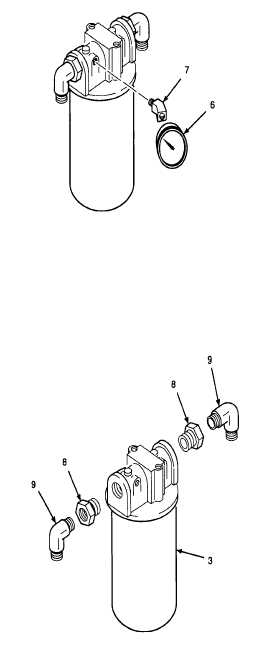
REMOVE - Continued.
2.
REMOVE ELBOWS, PIPE BUSHINGS, AND
PRESSURE GAUGE.
a.
Remove pressure gauge (6) and elbow (7).
Filter head is aluminum and may be
damaged if excessive pressure is
used when clamping in a vise. Use
only enough pressure to keep filter
head from turning.
b.
Carefully place hydraulic return filter assembly
(3) in a vise. Filter head is aluminum and may
be damaged by clamping.
c.
Hold pipe bushings (8) with open end wrench.
Remove elbows (9). Remove pipe bushings.
Discard hydraulic return filter assembly.
B.
INSTALL.
1.
INSTALL PIPE BUSHINGS, ELBOWS, AND
PRESSURE GAUGE.
a.
Use cleaning cloth to wipe residue from threads
of pipe bushings (8) and elbows (9).
b.
Carefully place hydraulic return filter assembly
(3) in a bench vise. Filter head is aluminum and
may be damaged by clamping.
Pipe sealant can cause eye damage
or skin irritation. Wash after skin
contact. Wear safety goggles/glasses
when using. Avoid contact with eyes
or skin. If sealant contacts eyes,
flush
eyes
with
water
and
get
immediate medical attention.
c.
Apply pipe sealant to male threads of pipe
bushings (8). Install pipe bushings onto both
sides of hydraulic return filter assembly (3).
Tighten pipe bushings.
d.
Apply pipe sealant to male pipe threads of
elbows (9). Hold pipe bushings (8) with a
wrench and install elbows on both sides of
hydraulic return filter assembly (3). Elbows
should point straight down when fully tightened.
GO TO NEXT PAGE
13-37