TM 5-3895-373-20
C.
ALIGN - Continued.
WARNING
Screed
operations
present
a
crushing hazard. Stay clear of
screed during screed operations.
Failure to do so may result in death
or serious injury.
NOTE
Cribbing is used under the screed
only as a safety precaution. Do not
lower the screed onto the cribbing.
Cribbing
may
have
to
be
repositioned
during
alignment
procedure to allow for placement of
straightedge
and
to
view
measurement points.
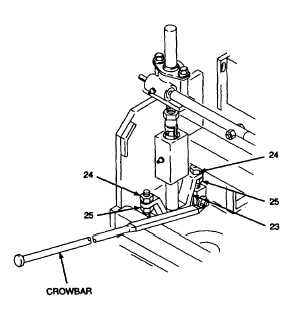
NOTE
It may be necessary to use pry bar to
raise lift bracket (23) to relieve
pressure on hex nuts (24 or 25) to
allow
for
ease
in
making
adjustments.
e.
Using crowfoot wrench, loosen hex nuts
(24) and adjust hex nuts (24 or 25) at front
or rear of lift bracket (23) to align extension
screed plate angle resulting in an equal
reading at B-B and C-C. If required, adjust
setting in step d. Continue adjusting hex
nuts (24 and 25) and screed height
adjustment knobs to obtain 0.125 to 0.19
in. (3,2 to 4,8 mm) height difference
between leading edge and trailing edge of
extension screed plate.
f.
Tighten hex nuts (24 and 25) without
changing angle of extension screed plate.
g.
Adjust extension screed height adjustment
to level trailing edge of extension screed
plates with trailing edge of main screed
plate at points B-B and C-C.
h.
Measure leading edge of extension screed
measurements B-B and C-C for 0.13 to
0.19 (3,2 to 4,8 mm) height difference
between leading edge of extension screed
plates and trailing edge of screed plates.
Repeat steps c through i as needed.
WARNING
Thread locking compound can cause
eye
damage.
Wear
safety
goggles/glasses when using. Avoid
contact with eyes. If compound
contacts eyes, flush eyes with water
and get immediate medical attention.
i.
Loosen hex nuts (24) enough to apply
thread locking compound. Tighten hex
nuts (24) to 37 lb-ft (50 N•m).