TM 5-3895-373-20
15.21. REPAIR STRIKEOFF EXTENSION ASSEMBLY.
This task covers:
a. Disassembleb. Clean
c. Assemble
INITIAL SETUP
Tools:
References:
General mechanic's automotive tool kit
TM 5-3895-373-10
(Item 54, Appendix E)
TM 5-3895-373-24P
Torque wrench (Item 68, Appendix E)
Wire scratch brush (Item 6, Appendix E)
Equipment Condition:
Strikeoff extension assembly removed per TM 5-3895-373-10.
Materials/Parts:
Cleaning cloth (Item 7, Appendix C)
Cleaning solvent (Item 24, Appendix C)
Self-locking nuts
NOTE
There is a left hand and a right hand
strikeoff extension assembly. Only
remove strikeoff extension assembly
being repaired. This procedure
refers
to
repairing
right
hand
strikeoff extension. Procedure is
identical
for
left
hand
strikeoff
extension assembly. Right hand
strikeoff
extension
assembly
is
shown in this procedure.
A.
DISASSEMBLE.
1.
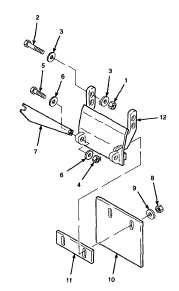
REMOVE STRIKEOFF SUPPORT.
a.
Remove self-locking nuts (1), hex head cap
screws (2), and flat washers (3). Discard
self-locking nuts.
b.
Remove self-locking nut (4), hex head cap
screw (5), and flat washers (6). Discard
self-locking nut.
c.
Remove strikeoff support (7).
2.
REMOVE STRIKEOFF PLATE.
NOTE
Note offset of slots in strikeoff plate
before removing the self-locking
nuts. The slots are not equal
distance from each edge of the
strikeoff plate.
a.
Remove self-locking nuts (8) and flat
washers (9). Discard self-locking nuts.
b.
Remove strikeoff plate (10) and spacer bar
(11) from screed extension strikeoff (12).
GO TO NEXT PAGE
15-150


