TM 5-3895-373-20
15.20. ADJUST AND ALIGN MAIN AND EXTENSION SCREED PLATES -Continued
B.
ADJUST Continued.
2.
INSTALL CRIBBING BENEATH EXTENSION
SCREEDS.
Screed
operations
present
a
crushing hazard. Stay clear of screed
during screed operations. Failure to
do so may result in death or serious
injury.
NOTE
Cribbing is used under the screed
only as a safety precaution. Do not
lower the screed onto the cribbing.
Cribbing
may
have
to
be
repositioned
during
alignment
procedure to allow for placement of
straightedge
and
to
view
measurement points.
a.
Place cribbing beneath extension screeds.
Leave leading edges and trailing edges of
screed plates clear of cribbing to make
measurements.
b.
Ensure weight of screed is not supported by
cribbing. Cribbing is being used as a safety
precaution only.
3.
SET MAIN SCREED CROWN ADJUSTMENT
TO NULL POSITION WITH SCREED RAISED.
a.
Lower hinged steps on main screed per TM 5-
3895373-10.
b.
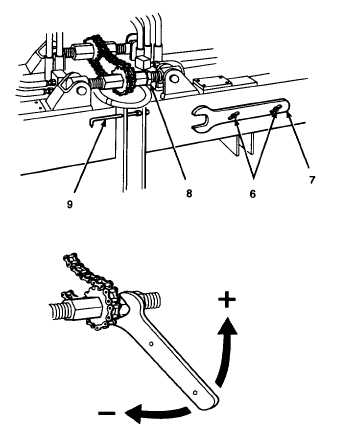
Remove thumbscrews (6) and crown adjustment
wrench (7) from main screed.
c.
Use crown adjustment wrench (7) to loosen hex
nut (8).
NOTE
The main screed plate has a positive
lead crown that cannot be nulled by
crown adjustment. Sized spacers
between main screed plate and main
screed frame on leading edge of
main screed hold the crown in
position. Only main screed plate
trailing edge crown can be nulled by
crown adjustment.
d.
Determine if a positive or negative crown is
present by reading crown pointer (9) on main
screed.
e.
To null a positive crown on main screed trailing
edge, pull crown adjustment wrench (7) down
toward screed trailing edge until crown pointer
reads approximately zero and no resistance is
felt on wrench.
f.
To null a negative crown on main screed trailing
edge, push crown adjustment wrench (7) up
toward screed leading edge until crown pointer
reads approximately zero and no resistance is
felt on wrench.
g.
Place straightedge along underside of main
screed trailing edge. Have a second person turn
crown adjustment until trailing edge of main
screed plate is flush with straightedge.
h.
Tighten hex nut (8) on crown adjustment with
crown adjustment wrench (7).
i.
Replace crown adjustment wrench (7) on main
screed and secure with thumbscrews (6).
GO TO NEXT PAGE
15-138


