
Slat Conveyor Chain Tightener (Four Used) Figure 19
SLAT CONVEYORS
Inverting Slat Bars
The right and left slat conveyors consist of a series of bars, linked together by two continuous chains attached to
the end of the bars. Either the right or left slat conveyor can be turned over to allow use of the other side as follows:
(1) Loosen chain (refer to following paragraph).
(2) Remove pin from chain link and break chain.
(3) Turn slat conveyor over and replace.
(4) Couple chain.
(5) Tighten chain.
Slat Conveyor Take-up
To adjust chain (Refer to Figure 19):
(1) Remove hopper end cover plate "B" from intake end of hopper "A".
(2) Loosen lock-nut "C" and tighten take-up.
(3) To loosen chain, loosen take-up nut "D".
(4) Tighten locknut "C" after proper adjustment.
IMPORTANT! Care should be taken that the two chains of each conveyor are tightened equally. The chain will be
properly tightened when 1" sag is present between return track and front sprockets.
CAUTION: DO NOT OVER-TIGHTEN. THIS WILL CAUSE EXCESS WEAR ON CHAIN. Also be sure that chain
cover guards are in good repairs for maximum protection to the chain from the feed materials.
(5) When chain is properly tightened, replace hopper end cover plate before operating.
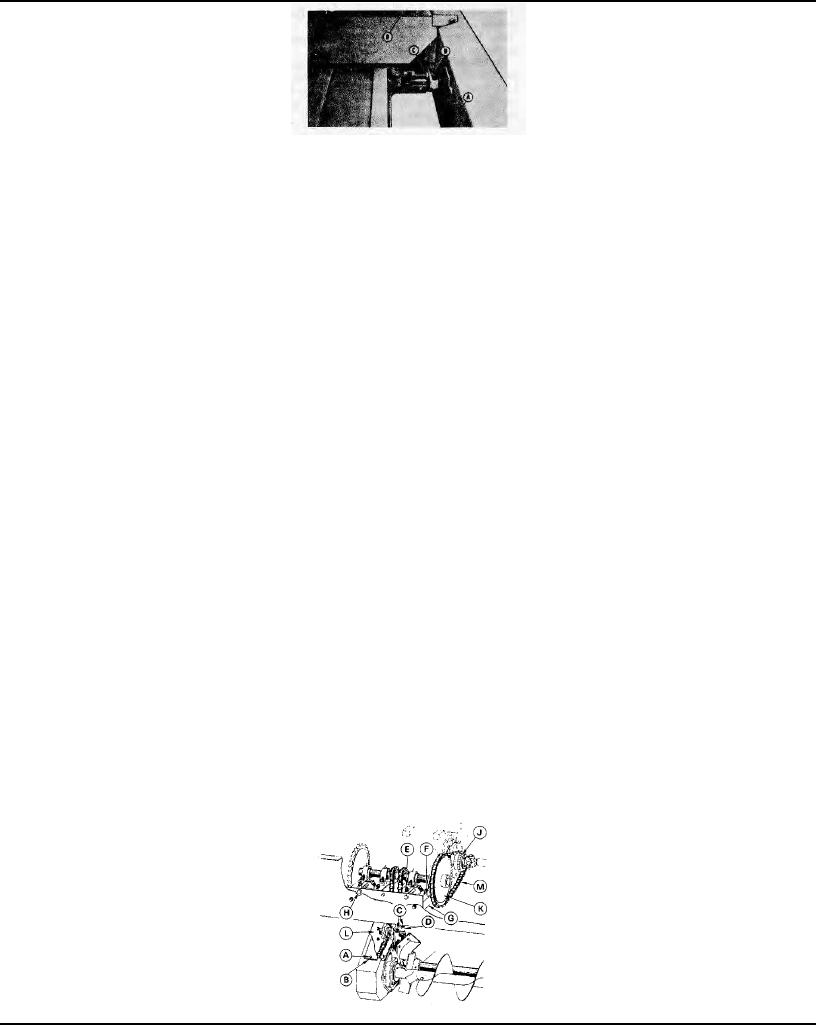
Slat Conveyor & Spreader Screw Drive Chain Take-up (Refer to Figure 20)
The right slat conveyor and spreader screw and the left slat conveyor and spreader screw are driven by individual
chain drives.
To tighten chain (be sure engine is not running):
(1) Remove bolts "A" that holds cover plate "B" in place.
(2) Remove cover plate "B".
(3) Loosen bolts "C" that hold Idler shaft take-up plates "D" in place.
NOTE: Idler shaft take-up plates are slotted for chain adjustment. To tighten chains, slide idler shaft take-up
plates forward and tighten bolts. When slots are used up in plates, slide plates back, tighten bolts "C" and make the
following adjustments:
(4) Loosen nuts "E" that hold take-up plates "F" in place.
(5) Make chain adjustment with bolt "H".
(6) If the limit of adjustment is reached before the chains are tight, back off bolts "H" to relieve tension of carriage
bolts "E".
(7) Shift carriage bolts E to the adjacent hole in Support "G" to obtain maximum adjustment, then readjust bolts
"H".
(8) With sprockets "J" and "K" in line, tighten nuts "E".
(9) Check tightness at opening "L". When both chains are properly adjusted, there should be a deflection of
approximately 1/2" on each chain. It is important to maintain this tightness at all times!
(10) Replace cover plate "B".
(11) If chain "M" is too loose (dragging on deck) break chain and remove link or /2 link until properly adjusted. This
chain can run looser than those in Step 9.
Conveyor Drive Chain Tighteners Figure 20
Page 109