TM 5-3895-373-34
2.67
REPLACE MAIN SCREED FRAME - Continued.
D.
INSTALL - Continued.
4.
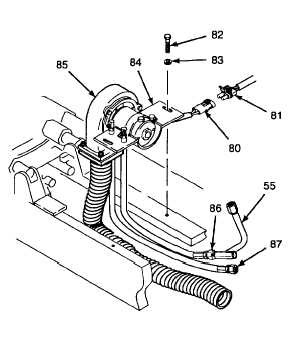
INSTALL BLOWER ASSEMBLY.
NOTE
If installing left hand main screed
blower assembly, there will be no
hydraulic hoses attached to blower
mounting bracket.
a.
Install blower mounting bracket (84), with blower
assembly (85), hydraulic hoses (86 and 87), and
tube (55) attached, where applicable, onto main
screed frame. Feed hydraulic hoses into main
screed frame.
b.
Install flat washer (83) onto hex head cap screw
(82).
WARNING
Thread locking compound can cause
eye
damage.
Wear
safety
goggles/glasses when using. Avoid
contact with eyes. If compound
contacts eyes, flush eyes with water
and get immediate medical attention.
c.
Apply thread locking compound
(Item
14,
Appendix B) to hex head cap screw (82).
d.
Install hex head cap screw (82). Ensure blower
mounting bracket (84) with blower assembly (85)
is positioned as far outboard as possible (screw
should be on inboard end of screw slot). Tighten
to 37 lb-ft (50 N.m).
e.
Apply electrical insulating compound to screed
harness electrical connector (81).
f.
Connect blower motor electrical connector (80)
to screed harness electrical connector (81).
g.
Install tie wraps as needed.
GO TO NEXT PAGE
2-946


