TM 5-3895-373-34
2.59
REPLACE HOPPER WING.
This task covers:
a. Remove
b. Install
INITIAL SETUP:
Tools:
Personnel Required:
General mechanic’s automotive tool kit
Two 62B construction equipment repairers. Second person
(Item 106, Appendix D)
needed for hoisting hopper wing and removing and installing
C-clamp, 2 ea (Item 30, Appendix D)
extension bracket.
Chain assembly, 2 ea (Item 29, Appendix D)
Hex head cap screw (Item 24, Appendix D)
References:
Hex head socket driver (Item 86, Appendix D)
TM 5-3895-373-20
Torque wrench (Item 132, Appendix D)
TM 5-3895-373-24P
Materials/Parts:
Equipment Condition:
Cleaning cloth (Item 6, Appendix B)
Remove hopper lift cylinder per TM 5-3895-373-20.
Grease (Item 18, Appendix B)
Thread locking compound (Item 13, Appendix B)
NOTE
Thread locking compound solvent (Item 32, Appendix B)
Flat washer
There is a left hand and a right hand hopper wing
Headless straight rod
on the paving machine. This procedure refers to
Hex head cap screw
replacement of the left hand hopper wing. Only
remove hopper lift cylinder on hopper wing being
replaced. Procedure is identical for right hand
hopper wing. Left hand hopper wing is shown in
this procedure.
A.
REMOVE.
1.
REMOVE FLASHING, CONVEYOR ACCESS
DOOR, AND EXTENSION BRACKET.
a.
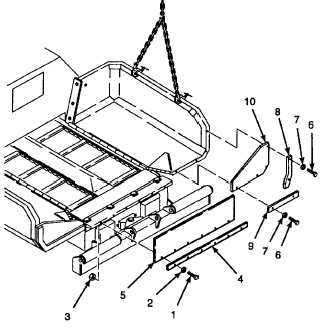
Remove hex head cap screws (1), flat washers
(2), and hex nuts (3).
b.
Remove retaining plate (4) and center flashing
(5).
c.
Remove hex head cap screws (6) and flat
washers (7).
d.
Remove retaining plates (8 and 9) and wing
flashing (10).
GO TO NEXT PAGE
2-813