TM 5-3895-373-34
2.26
REPAIR CONTROL HANDLE - Continued.
C.
ASSEMBLE.
1.
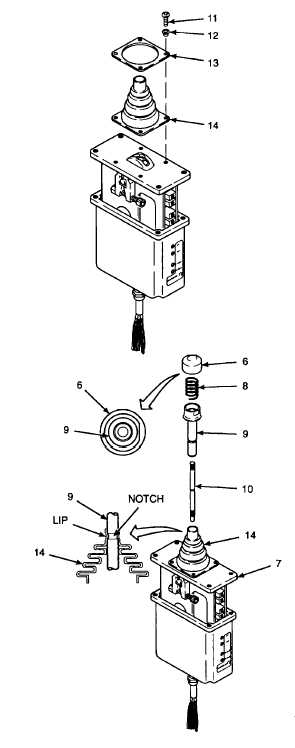
INSTALL BOOT AND RETAINING PLATE ONTO
CONTROL HANDLE.
a.
Install boot (14).
b.
Install retaining plate (13).
c.
Install collar seal (12) onto pan head cap screws
(1 I).
NOTE
Pan
head
cap
screws
will
be
tightened after mounting onto gauge
panel.
d.
Use a screwdriver from six-point screwdriver set
to install pan head cap screws (11) hand tight.
2.
INSTALL HANDLE, CENTER LOCK HANDLE,
CENTER
LOCK
SPRING,
AND
KNOB
ONTO
CONTROL HANDLE.
Sealing compound can cause eye
damage.
Wear
safety
goggles/glasses when using. Avoid
contact
with
eyes.
If
sealing
compound contacts eyes, flush eyes
with water and get immediate medical
attention.
a.
Apply sealing compound to threads on bottom of
handle (10).
b.
Install handle (10).
c.
Install center lock handle (9) through boot (14)
and onto control handle (7). Fit lip in boot (14)
into notch in center lock handle (9).
d.
Install center lock spring (8).
e.
Apply sealing compound to threads on top of
handle (10).
f.
Install knob (6) onto handle (10), fitting flat spot
on knob with flat spot on center lock handle (9).
Tighten knob hand tight.
GO TO NEXT PAGE -
2-356


