TM 5-3895-373-34
2.71
REPLACE MAIN AND EXTENSION SCREED PLATES - Continued.
B.
REMOVE - Continued.
c.
Remove
main
screed
plate
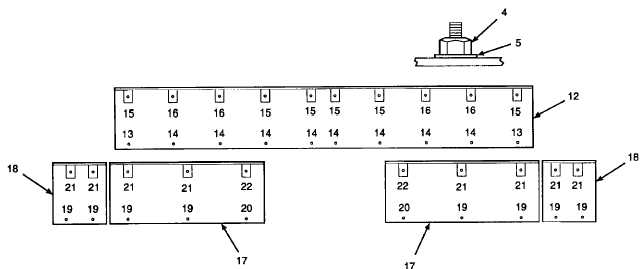
(12)
by
removing self-locking nuts (4) and flat
washers (5) at stud (13) through (16)
locations. Refer to chart below for tools
required and removal comments. Use self-
locking nuts to secure shims, plate spacers,
and spacers while performing steps in step
C.
d.
To remove inner and outer extension
screed plates (17 and 18), remove self-
locking nuts (4) and flat washers (5) at stud
(19 through 22) locations. Refer to chart
below for tools required and removal
comments. Use self-locking nuts to secure
shims, plate spacers, and spacers while
performing steps in step C.
Stud
Tools
Removal Comments
13
3/4 in. socket, 1/2 in. drive ratchet, 10 in. extension
Reach into trailing edge of main screed. Locate and remove
self-locking nuts from outer edges with aid of extension and
socket.
14
3/4 In. socket, 1/2 in. drive ratchet, 6 In. extension
Access directly.
15
3/4 In. socket, 1/2 in. drive ratchet, 6 in. extension
Reach through trailing edge of main screed. Locate and
remove self-locking nuts from forward comers of screed with
aid of 6 in. extension and socket.
16
3/4 in. socket, 1/2 in. drive ratchet
Reach through trailing edge of main screed.
19
3/4 In. socket, 1/2 In. drive ratchet, 10 in. extension
Access directly. 10 inch extension prevents step interference.
20
3/4 in. socket, 1/2 in. drive ratchet, universal adapter,
Use universal adapter to bypass interference from step
10 in. extension
support.
21
3/4 In. socket, 1/2 in. drive ratchet, 10 in. and 6 in.
Combine extensions. Gain access to self-locking nuts through
extensions
top of extension screeds.
22
3/4 in. socket, 1/2 in. drive ratchet, 6 In. extension,
Access directly.
universal adapter, 10 in. extension
GO TO NEXT PAGE
2-1026


