TM 5-3895-373-20
14.5.
REPLACE BURNER CHAMBER AND FUEL SPRAY NOZZLE - Continued.
D.
ASSEMBLE Continued.
2.
ASSEMBLE BURNER CHAMBER ASSEMBLY.
Sealing compound can cause eye
damage. Wear safety goggles/glasses
when using. Avoid contact with eyes.
If compound contacts eyes, flush
eyes with water and get immediate
medical attention.
a.
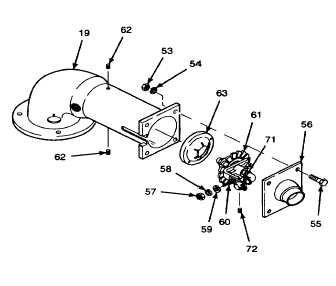
Apply sealing compound to threads of set
screws (62).
b.
Install burner head unit (63) into burner chamber
assembly (19) and secure with set screws (62).
Tighten set screws until flush with outside of
burner chamber assembly.
c.
Slide nozzle assembly (61) into burner chamber
assembly (19) with holder stud (60) in slot on
burner chamber assembly and retainer (71) on
the outside of the burner chamber assembly.
d.
Install flat washer (59), lockwasher (58), and
hand tighten hex nut (57) onto holder stud (60).
Hex nut will be tightened during adjustment.
e.
Apply sealing compound to threads of set screw
(72).
f.
Install set screw (72) into retainer (71). Push
retainer tight against burner and tighten set
screw.
g.
Apply sealing compound to threads of hex head
cap screw (55).
NOTE
Ensure adapter is positioned as in
disassembly.
h.
Install adapter (56) against burner chamber
assembly and secure in place with hex head cap
screws (55), lockwashers (54), and hex nuts
(53). Tighten hex nuts to 37 Ib-ft (50 N-m).
GO TO NEXT PAGE
14-40


