TM 5-3895-373-20
11.5.
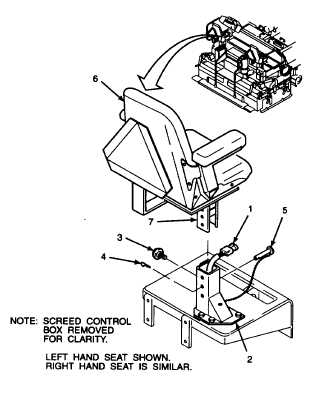
REPLACE/REPAIR SEAT ASSEMBLY.
This task covers:
a. Remove
b. Repair
c. Install
INITIAL SETUP
Tools:
References:
General mechanic’s automotive tool kit
TM 5-3895-373-24P
(Item 54, Appendix E)
Torque wrench (Item 68, Appendix E)
Equipment Condition:
Materials/Parts:
Work light under seat removed per paragraph 7.12.
Thread locking compound (Item 12, Appendix C)
Thread locking compound solvent (Item 25, Appendix C)
Retaining pin
Self-locking hex nuts
NOTE
There is a left hand and a right hand
seat
assembly
on
the
paving
machine. Remove the work light only
from the side being worked on. This
procedure refers to replacing and
repairing left hand seat assembly.
Use same procedure for right hand
seat
assembly.
Any
differences
between left hand and right hand seat
assemblies are addressed in text.
Left hand seat assembly is shown in
this procedure.
A.
REMOVE.
1.
REMOVE ASSEMBLED SEAT AND UPPER
SEAT
PEDESTAL
FROM
LOWER
SEAT
PEDESTAL.
a.
Push work light wiring harness (1) down into
lower seat pedestal (2) to avoid damage to
work light wiring harness.
b.
Remove knob (3) from side of lower seat
pedestal
facing
outside
of
machine,
retaining pin (4), and locking pin (5).
Locking pin will be removed but still
attached to seat pedestal mounting hex
head cap screw. Discard retaining pin.
c.
Remove assembled seat (6) and upper seat
pedestal (7) from lower seat pedestal (2).
GO TO NEXT PAGE
11-41