TM 5-3895-373-34
2.61
REPLACE CONVEYOR CHAIN ASSEMBLY.
This task covers:
a. Remove
b. Clean
c.
Inspect
d. Replace
INITIAL SETUP:
Tools:
Personnel Required:
General mechanic’s automotive tool kit
Three 62B construction equipment repairers. One person to
(Item 106, Appendix D)
operate conveyor manually. Two persons needed for removal
Combination wrench (Item 116, Appendix D)
and replacement of conveyor chain assembly.
Elastic cord assembly (Item 34, Appendix D)
Hex head driver socket (Item 86, Appendix D)
References:
Hex head driver socket (Item 87, Appendix D)
TM 5-3895-373-10
Outside micrometer (Item 15, Appendix D)
TM 5-3895-373-20
Outside micrometer (Item 18, Appendix D)
TM 5-3895-373-24P
Socket wrench adapter (Item 7, Appendix D)
Torque wrench (Item 132, Appendix D)
Equipment Condition:
Wire scratch brush (Item 13, Appendix D)
Paving machine jacked and chocked per TM 5-3895-373-20.
Flow gates fully raised per TM 5-3895-373-10.
Materials/Parts:
Hopper wings fully lowered per TM 5-3895-373-10.
Cleaning cloth (Item 6, Appendix B)
Screed removed per TM 5-3895-373-20.
Cleaning solvent (Item 31, Appendix B)
Rope, 2 ea (24 ft, cut from Item 73, Appendix D)
Thread locking compound (Item 13, Appendix B)
Thread locking compound solvent (Item 32, Appendix B)
Cotter pins
NOTE
This task covers replacement of the
right side conveyor chain assembly
only. Procedures for replacement of
the left conveyor chain assembly are
identical to those for the right side.
A.
REMOVE.
1.
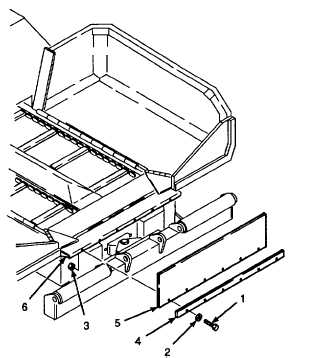
REMOVE CENTER FLASHING.
a.
Remove hex head cap screws (1), flat washers
(2), and hex nuts (3).
b.
Remove retaining plate (4) and center flashing
(5) from extension bracket (6).
GO TO NEXT PAGE
2-835