TM 5-3895-373-34
C.
INSTALL - Continued.
c.
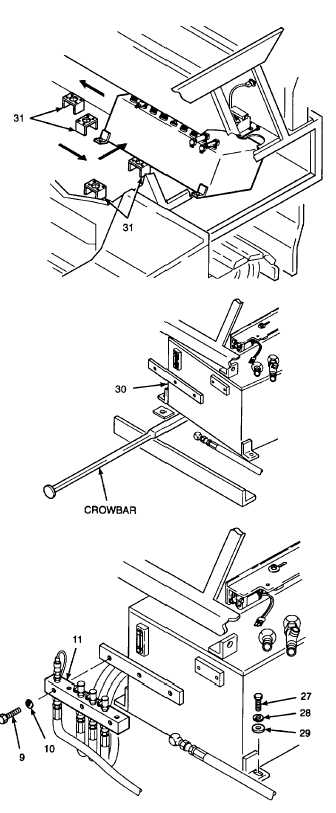
Lower
hydraulic
reservoir
into
engine
compartment on top of engine mounts (31).
Remove sling straps.
d.
With help of another person, tilt and move
hydraulic reservoir into fuel tank mounting
location.
e.
Move hydraulic reservoir (30) to right side of
paving machine. Lift reservoir over hydraulic
hoses as needed and tilt reservoir forward to
clear obstructions using crowbar.
f.
Raise
hydraulic
reservoir
(30)
and
place
mounting brackets on reservoir support plates.
Line
up
reservoir
mounting
brackets
with
threaded holes in reservoir support plates.
g.
Install lockwashers (28) and flat washers (29)
onto hex head cap screws (27).
WARNING
Thread locking compound can cause
eye
damage.
Wear
safety
goggles/glasses when using. Avoid
contact with eyes. If compound
contacts eyes, flush eyes with water
and get immediate medical attention.
NOTE
Front outboard hex head cap screw
(27) shown will be used for ground
lead
mounting
during
engine
installation.
Thread
locking
compound will be applied at that
time.
h.
Apply thread locking compound to threads of
three hex head cap screws (27).
i.
Install hex head cap screws (27) into mounting
brackets. Do not tighten hex head cap screws at
this time.
j.
Temporarily install test manifold (11), with hex
head cap screws (9); do not tighten hex head
cap screws. Adjust position of hydraulic
reservoir as needed.
k.
Remove hex head cap screws (9), lockwashers
(10) and test manifold (11). Tighten rear and
front inboard hex head cap screws (27) to 37 Ib-
ft (50 N.m). Leave front outboard hex head cap
screw loose for ground lead installation, during
engine installation.
GO TO NEXT PAGE
2-715