TM 5-3895-373-34
2.45
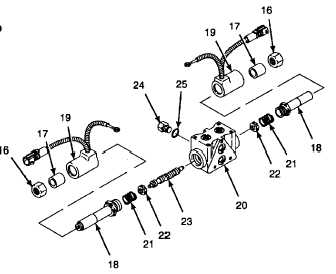
REPAIR AUGER/CONVEYOR CONTROL VALVE
A.
DISASSEMBLE - Continued.
3.
REMOVE ELECTRICAL COILS, SLEEVES,
TUBES, AND SPOOL FROM VALVE BODY.
a. Remove hex nuts (16) and sleeves (17) from tubes
(18).
Tubes are fragile and easily dented. Use
extreme
caution
when
removing
electrical coils from tubes. Dented
tubes
may
impair
electrical
coil
operation.
b.
Slide electrical coils (19) from tubes (18).
NOTE
Spring and retainer may fall from valve
body after tubes are removed.
c.
Use the combination wrench and remove tubes
(18) from valve body (20).
d.
Remove springs (21) and retainers (22) from
valve body (20).
Do not drop spool or allow it to scrape
across threads in valve body. Handle
spool with care. Damage to surface of
spool can prevent it from working
properly.
e.
Remove spool (23) from valve body (20).
f.
Remove plug (24) and preformed packing (25)
from valve body (20). Discard preformed
packing.
4.
DISASSEMBLE RELIEF VALVE ASSEMBLY.
a.
Remove plug (26) and preformed packing (27)
from relief valve assembly body (28). Discard
preformed packing.
b.
Remove cap (29) and compression nut (30).
Use caution when removing seals and
preformed packings.
Scratched
or
dented seal grooves can cause bypass
leakage. Do not use excessive force
when removing seals and preformed
packings. Use an o-ring tool to remove
seals and preformed packings.
c.
Use an o-ring tool to remove
preformed
packings (31 and 32). Discard preformed
packings.
d.
Remove relief valve (33) from relief valve
assembly body (28).
e.
Use an o-ring tool to remove
preformed
packings (34 and 35) and packing retainer (36).
Discard
preformed
packings
and
packing
retainer.
GO TO NEXT PAGE
2-622