TM 5-3895-373-34
2.22.
REPLACE/REPAIR FUEL TANK.
This task covers:
a.
Remove
b.
Clean
c.
Adjust
d.
Install
INITIAL SETUP
Tools:
Personnel Required:
General mechanic’s automotive tool kit
Two 62B construction equipment repairers. Second person to
(Item 106, Appendix D)
assist when removing and installing fuel tank.
Sling strap, 2 ea (Item 98, Appendix D)
Socket wrench extension, (Item 39, Appendix D)
References:
Torque wrench (Item 132, Appendix D)
TM 5-3895-373-20
TM 5-3895-373-24P
Materials/Parts:
Cleaning cloth (Item 6, Appendix B)
Equipment Condition:
Cleaning solvent (Item 31, Appendix B)
Screed tow arm removed per TM 5-3895-373-20
Electrical insulating compound (Item 10, Appendix B)
(only required for fuel tank removal).
Electrical insulating varnish (Item 38, Appendix B)
Fuel tank drained per TM 5-3895-373-20.
Sealing compound (Item 12, Appendix B)
Engine removed per paragraph 2.16.
Tags (Item 34, Appendix B)
Thread locking compound (Item 13, Appendix B)
Thread locking compound (Item 14, Appendix B)
Thread locking compound solvent (Item 32, Appendix B)
Fuel filler assembly
Fuel level liquid transmitter
Lockwashers
Screws
A.
REMOVE.
1.
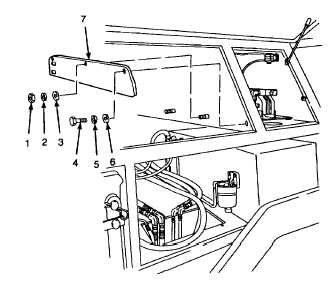
REMOVE BULKHEAD PARTITION.
a.
Remove hex nuts (1), lockwashers (2), and flat
washers (3). Discard lockwashers.
b.
Remove hex head cap screw (4), lockwasher
(5), and flat washer (6). Discard lockwasher.
c.
Remove bulkhead partition (7).
GO TO NEXT PAGE
2-306


