TM 5-3895-373-20
C.
INSTALL - Continued.
CAUTION
Do
not
apply
thread
locking
compound to hex head cap screws
(50). Damage to vibration mounts
(53) could occur during removal if
thread locking compound is applied.
NOTE
There are two vibration mounts on
each end of the
right
and
left
extension walkway steps.
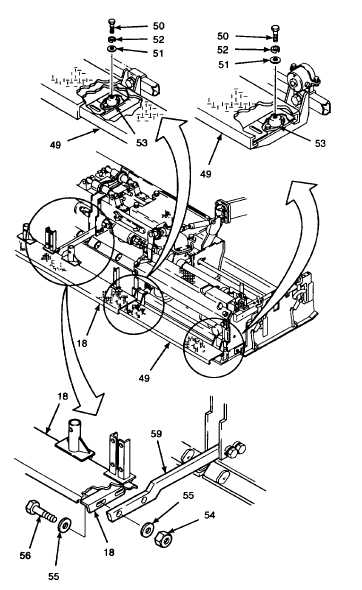
1.
Secure extension walkway steps (49) to vibration
mounts (53) using hex head cap screws (50), flat
washers (51), and lockwashers (52). Do not
apply thread locking compound to hex head cap
screws.
m.
Tighten hex head cap screws (50) snug.
n.
Remove one of two hex head cap screws
(56) along with flat washer (55).
WARNING
Thread locking compound can cause
eye
damage.
Wear
safety
goggles/glasses when using. Avoid
contact with eyes. If compound
contacts eyes, flush eyes with water
and get immediate medical attention.
o.
Apply thread locking compound (Item 12,
Appendix C) to threads of hex head cap
screw (56).
p.
Install hex head cap screw (56) through
hole in main walkway step (18) and hole in
center step support (59). Do not tighten at
this time.
q.
Remove second hex head cap screw (56)
along with flat washer (55).
r.
Apply thread locking compound (Item 12,
Appendix C) to threads of hex head cap
screw (56).
s.
Install hex head cap screw (56) through
hole in main 2.24.2. walkway step (18) and
hole in center step support (59).
t.
Tighten hex nuts (54) to 37 lb-ft (50 N•m).
u.
Remove cribbing from screed. Refer to
paragraph
v.
Retract extension screeds and lower
screed. Refer to TM 5-3895-373-10.
GO TO NEXT PAGE
11-27