TM 5-3895-373-20
11.2.
REPAIR ACCESS DOORS AND COVERS - Continued.
B.
INSTALL - Continued.
2.
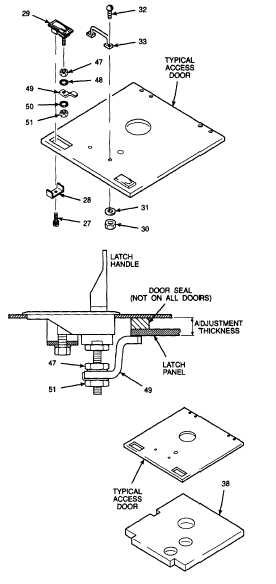
INSTALL LATCHES AND HANDLES.
a.
Remove machine screw (27) and bracket
(28) from latch (29).
b.
Install adjust hex nut (47), lockwasher
(48), pawl (49), lockwasher (50), and
adjust hex nut (51) onto latch (29). Do not
tighten adjust hex nut (51).
c.
Install latch (29) and secure with bracket
(28) and machine screw (27). Tighten
machine screw.
NOTE
If no door seal is on access door,
measure thickness of latch panel
only.
d.
Measure thickness of latch panel and,
where applicable, door seal. This total
thickness
is
equal
to
the
required
adjustment thickness.
e.
Close latch handle and loosen adjust hex
nuts (47 and 51). Screw pawl (49) up or
down
to
the
required
adjustment
thickness.
f.
Tighten both adjust hex nuts (47 and 51).
g.
Install
handle
(33)
and
secure
with
machine screws (32), flat washers (31),
and hex nuts (30). Tighten hex nuts.
3.
INSTALL SOUND FOAM.
a.
Position sound foam (38), with backing in
place, on inside of access door so that cut
openings in sound foam fit around all
latches and openings in panel. Lightly
scribe a line around sound foam to ensure
proper
placement
after
backing
is
removed.
b.
Remove sound foam (38) and peel off
backing to expose adhesive backing.
c.
Carefully position sound foam (38) on
access door and press firmly in place.
GO TO NEXT PAGE
11-10