TM 5-3895-373-20
C.
ADJUST.
1.
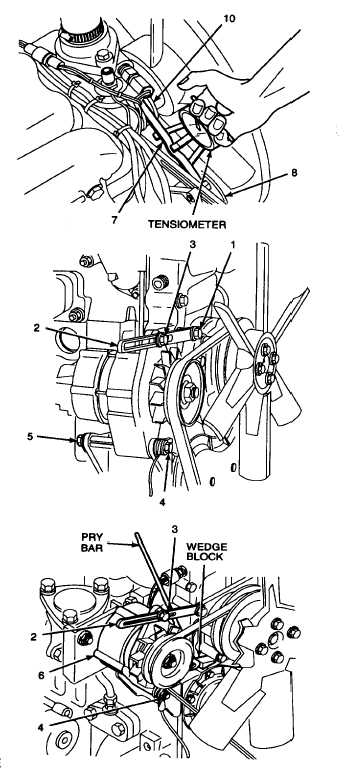
CHECK FAN BELT TENSION.
a.
Install tension meter on fan belt (7) midway
between alternator pulley (8) and water pump
pulley (10).
b.
Push down on tension meter plunger and read
dial indicator. Tension should be 10 lb (45 N)
nominal.
c.
Hold self-locking hex nut (4) and tighten pivot
bolt (5) to 20 lb-ft (27 N•m). Recheck tension on
fan belt (7). If necessary, readjust fan belt
tension per step C.2.
2.
ADJUST FAN BELT TENSION.
a.
Loosen adjustment screw (3), hold self-locking
hex nut (4), and loosen pivot bolt (5).
b.
Loosen hex head cap screw (1) to allow for
movement of belt adjusting arm (2).
c.
Using wedge block and pry bar, readjust position
of alternator (6). When tension feels right,
maintain pressure and tighten adjustment screw
(3) to 20 lb-ft (27 N•m).
d.
Tighten hex head cap screw (1) to 14 lb-ft (19
N•m).
e.
Check fan belt tension per step C.1.
f.
Repeat steps a through d until tension meter
indicates 10 lb (45 N).
g.
Hold self-locking hex nut (4) and tighten pivot
bolt (5) to 20 lb-ft (27 N•m). Remove pry bar and
wedge block.
NOTE
FOLLOW-ON-TASK:
Close front top left access door per TM 5-3895-373-10.
END OF TASK
6-21(6-22 blank)


