TM 5-3895-373-20
6.7.
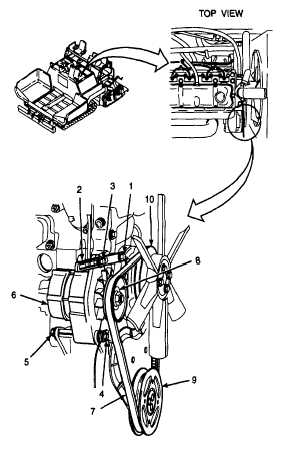
REPLACE FAN BELT.
This task covers:
a.
Remove
b.
Install
c.
Adjust
INITIAL SETUP
Tools:
References:
General mechanic’s automotive tool kit
TM 5-3895-373-10
(Item 54, Appendix E)
TM 5-3895-373-24P
Tensiometer (Item 51, Appendix E)
Torque wrench (Item 68, Appendix E)
Equipment Condition:
Wedge block (Item 3, Appendix D)
Front top left access door open per TM 5-3895-373-10.
Materials/Parts:
Fan belt
A.
REMOVE.
1.
LOOSEN ALTERNATOR.
a.
Loosen hex head cap screw (1) to allow for
movement of belt adjusting arm (2).
b.
Loosen adjustment screw (3) securing belt
adjusting arm (2).
c.
Secure self-locking hex nut (4) and loosen pivot
bolt (5) on bottom of alternator (6).
2.
REMOVE FAN BELT.
a.
Push alternator (6) toward engine block to free
fan belt (7).
b.
Remove fan belt (7) from alternator pulley (8),
crankshaft pulley (9), and water pump pulley
(10).
c.
Slide fan belt (7) between fan blades and
radiator shroud one fan blade at a time.
Remove and discard fan belt.
B.
INSTALL.
1.
INSTALL FAN BELT.
a.
Install fan belt (7) between fan blades and
radiator shroud one fan blade at a time.
b.
Seat fan belt (7) on water pump pulley (10),
crankshaft pulley (9), and alternator pulley (8).
GO TO NEXT PAGE
6-19