
Engine Systems
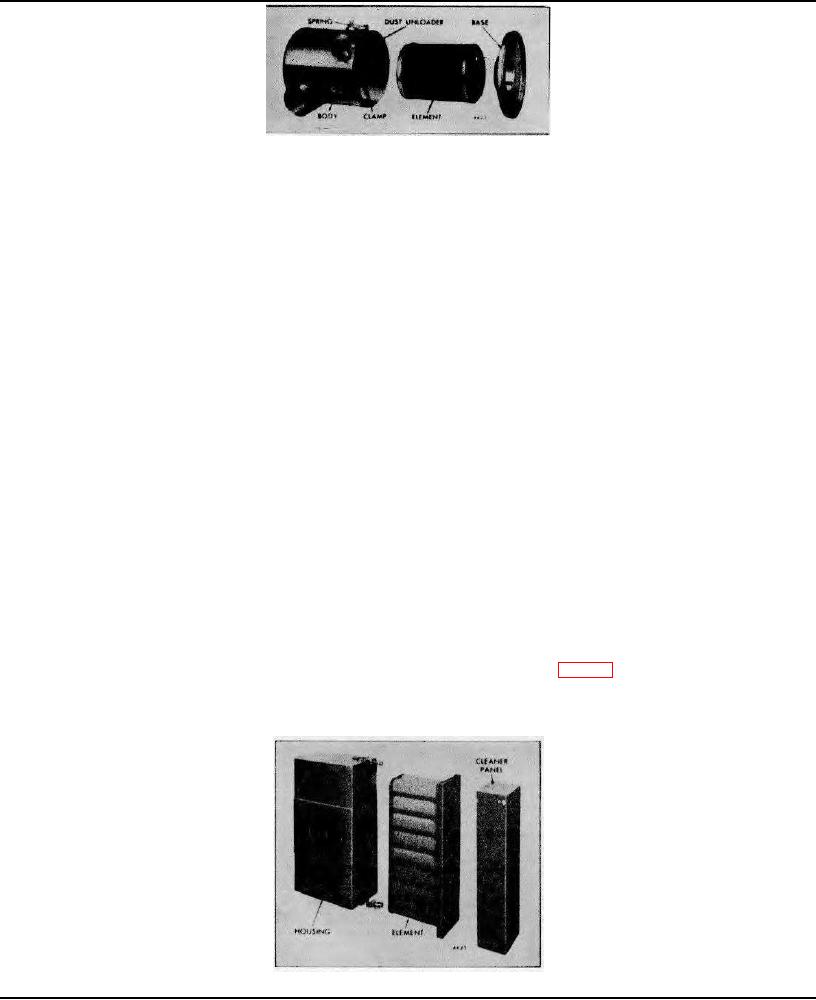
Fig. 12 - United Specialties Dry Type Air Cleaner
1. Loosen the clamp screw and check the dust unloader for obstruction or damage.
2. Unlock the spring clamps that hold the cleaner body to the cleaner base which is bolted to the air inlet housing.
Remove the body and then remove the element from the cleaner base.
3. The paper pleated air cleaner element can be cleaned as follows:
a. For a temporary expedient in the field, tap the side or end of the element carefully against the palm of your hand.
CAUTION: Do not tap the element against a hard surface. This could damage the element.
b. Compressed air can be used when the major contaminant is dust. The compressed air (not to exceed 100 psi or 689
kPa) should be blown through the element in a direction opposite to the normal air flow. Insert the air nozzle inside
of the element and gently tap and blow out the dust with air. When cleaning the dust from the outside of the
element, hold the nozzle at least 6" from the element.
c. Wash the element if compressed air is not available, or when the contaminant is carbon, soot, oily vapor or dirt which
cannot be removed with compressed air.
d. Agitate the element in warm water containing a non-sudsing detergent.
CAUTION: Do not use water hotter than your hand can stand, solvents, oil, fuel oil or gasoline.
Preceding the washing, it helps to direct air (not exceeding 100 psi or 689 kPa) through the element in a direction
opposite the normal air flow to dislodge as much dust as possible. Reverse flush with a stream of water (not exceeding
40 psi or 276 kPa) until the water runs clean to rinse all loosened foreign material from the element. Shake out excess
water from the element and allow it to dry thoroughly.
CAUTION: Do not attempt to remove excess water by using compressed air.
4. Inspect the cleaned element with a light bulb after each cleaning for damage or rupture. The slightest break in the
element will admit sufficient airborne dirt to cause rapid failure of piston rings. If necessary, replace the element.
5. Inspect the gasket on the end of the element. If the gasket is damaged or missing, replace the element.
6. Install the element on the base with the gasket side of the element down against the base. Place the body over the
element and base and tighten the spring clamps by hand.
7. Replace the element after 10 washings or I year of service, whichever comes first, or any time damage is noted.
8. Install the dust unloader and tighten the clamp. The Farr dry-type air cleaner, (Fig. 13) is designed to provide highly
efficient air filtration under all operating conditions and is not affected by engine speed. The cleaner assembly consists
of a cleaner panel with a replaceable impregnated paper filter element.
The cleaner panel and replaceable filter element are held together in a steel housing with fasteners.
Fig. 13 - Farr Dry Type Air Cleaner
Page 20