TM 5-3895-373-34
2.46
REPAIR TOW POINT CONTROL VALVE - Continued. ADS
D.
ASSEMBLE - Continued.
4.
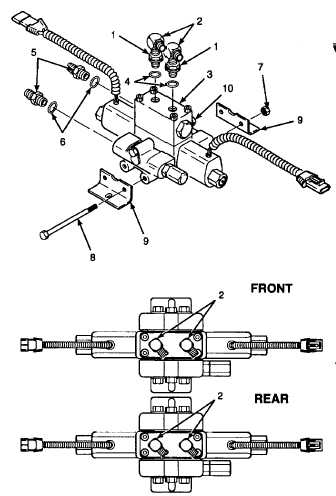
INSTALL
MOUNTING
BRACKETS
AND
THREADED END RODS ON TOW POINT
CONTROL VALVE.
a.
Install threaded end rods (8) through
mounting bracket (9) and through tow point
control valve (3).
b.
Install second mounting bracket (9) over
threaded end rods (8).
c.
Install hex nuts (7) on threaded end rods
(8).
d.
Tighten hex nuts (7 and 10) on threaded
end rods in three steps: 75 lb-in (8 N•m),
100 lb-in (11 N•m), then 125 lb-in (14 N•m).
5.
INSTALL
STRAIGHT
ADAPTERS
AND
ELBOWS ON TOW POINT CONTROL VALVE.
Hydraulic
oil
can
be
moderately
flammable and can be an irritant to
the
skin,
eyes,
and
respiratory
system. Avoid prolonged exposure.
Eye protection and rubber gloves
must be worn when working with
hydraulic oil.
Be careful not to damage preformed
packing when sliding over threads.
Sharp edges of threads can cut or
damage
preformed
packing.
Damaged
preformed
packing
will
cause
leakage
and
affect
performance.
a.
Lubricate with clean hydraulic oil and install
preformed packings (4 and 6) onto straight
adapters (5) and elbows (2).
b.
Install straight adapters (5) into tow point
control valve (3).
c.
Install elbows (2) into tow point control
valve. Screw elbows into mating ports until
preformed packings (4) seat on lock valve.
d.
Adjust threaded end of elbows (2) to
position shown. Tighten elbow nuts (1).
NOTE
FOLLOW-ON-TASKS: Install tow point control valve on valve panel per
paragraph 2.55.
Adjust tow point relief valve per paragraph 2.51.
END OF TASK
2-642