TM 5-3895-373-34
2.17
DIESEL ENGINE REPAIR.
C.
INSPECT - Continued.
d.
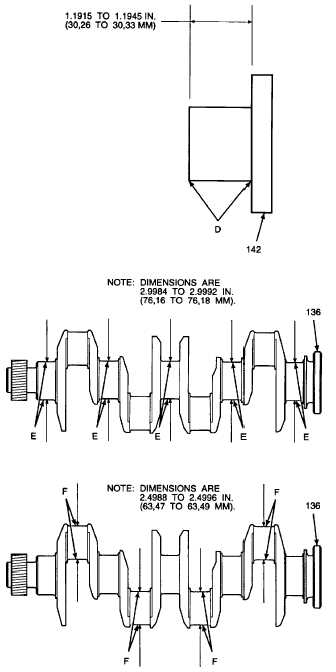
Use an inside caliper to measure width of idler
gear hub (142) Surface D.
e.
Idler gear hub width must be 1.1915 to 1.1945
in. (30,26 to 30,33 mm).
f.
If idler gear hub width is greater than 1.1945 in.
(30,33 mm), replace idler gear hub.
3.
INSPECT
CRANKSHAFT
ASSEMBLY
MAIN
JOURNALS AND CONNECTING ROD JOURNALS
FOR WEAR AND OVALITY.
a.
Use an outside micrometer (Item 17,
Appendix D) to measure outside diameters of
main
journal
Surfaces
E
on
crankshaft
assembly (136).
b.
Outside diameters of main journal Surfaces E
must be 2.9984 to 2.9992 in. (76,16 to 76,18
mm), with a maximum wear/ovality allowance
of 0.0015 in. (0,04 mm).
c.
If main journal surface outer diameters are less
than 2.9984 in. (76,16 mm) or ovality
exceeds 0.0015 in. (0,04 mm), regrind or
replace crankshaft assembly (136).
d.
Use an outside micrometer (Item 17,
Appendix D) to measure outside diameters of
connecting
rod
journal
Surfaces
F
on
crankshaft assembly (136).
e.
Outside diameters of connecting rod journal
Surfaces F must be 2.4988 to 2.4996 in.
(63,47 to 63,49 mm), with a maximum
wear/ovality allowance of 0.0015 in. (0,04
mm).
f.
If connecting rod journal surface diameters are
less than 2.4988 in. (63,49 mm) or oyality
exceeds 0.0015 in. (0,04 mm), regrind or
replace crankshaft assembly (136).
GO TO NEXT PAGE
2-174


