TM 5-3895-373-20
14.3.
REPLACE/REPAIR BURNER AND FUEL SPRAY
B.
REPAIR - Continued.
2.
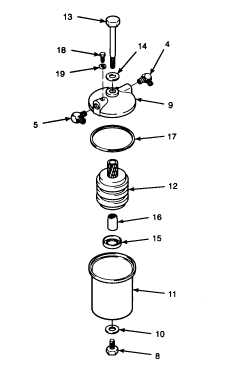
ASSEMBLE FUEL FILTER COMPONENTS.
a.
Seat filter element (12) on center spud (16)
and seal (15) and place in filter bowl (11).
Secure filter element in place with gasket
(10) and spud bolt (8). Tighten spud bolt as
tight as possible with fingers.
WARNING
Fuel is very flammable and can
explode easily. To avoid serious
injury or death:
Always wear safety glasses/goggles
at all times.
Keep fuel away from open flame or
spark (ignition source).
Keep at least a B-C fire extinguisher
within easy reach when working with
fuel or on a fuel system.
Post signs that read "NO SMOKING
WITHIN 50 FEET" when working with
open fuel lines or fuel tanks.
b.
Coat filter head gasket (17) with clean fuel
and place on filter bowl (11).
c.
Squarely seat filter bowl (11) onto filter head
(9). Secure with gasket (14) and center bolt
(13).
CAUTION
Ensure that center spud (16) is seated
in the bottom of filter bowl (11) or
filter element (12) may be smashed.
d.
Hold filter and tighten spud bolt (8) then
tighten center bolt (13).
e.
Install vent gasket (19) and vent screw (18)
and tighten vent screw.
f.
Use cleaning cloth to wipe residue from
threads of elbows (4 and 5).
WARNING
Pipe sealant can cause eye damage
or skin irritation. Wash after skin
contact. Wear safety goggles/glasses
when using. Avoid contact with eyes
or skin. If sealant contacts eyes,
flush
eyes
with
water
and
get
immediate medical attention.
g.
Apply a light coating of pipe sealant to pipe
threads of elbows (4 and 5). Ensure pipe
sealant is used sparingly so as not to clog
fuel hoses or other fuel components.
h.
Install pipe thread side of elbows (4 and 5)
into filter head (9). Tighten elbows so that
they are both pointed in the direction
shown. Refer to illustration.
GO TO NEXT PAGE
14-12