TM 5-3895-373-20
4.5. REPAIR FUEL TANK - Continued.
B. INSTALL.
WARNING
Fuel is very flammable and can
explode easily. To avoid serious
injury or death:
Always wear safety glasses/goggles
at all times.
Keep fuel away from open flame or
any spark (ignition source).
Keep at least a B-C fire extinguisher
within easy reach when working with
fuel or on a fuel system.
Post signs that read "NO SMOKING
WITHIN 50 FEET" when working with
open fuel lines or fuel tanks.
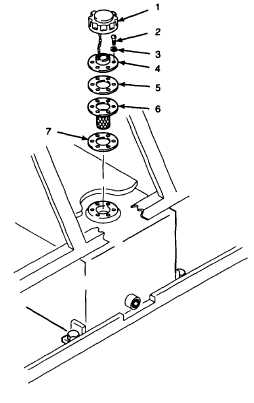
1.
ASSEMBLE BREATHER AND FILLER NECK.
a.
Align mounting holes on gasket (7) with
the mounting holes on fuel tank and place
the gasket onto the fuel tank.
b.
Align mounting holes of fuel strainer (6)
with mounting holes on the fuel tank and
place the fuel strainer onto gasket (7).
c.
Align mounting holes of gasket (5) with
mounting holes on the fuel tank and place
the gasket onto fuel strainer (6).
d.
Align mounting holes of filler neck (4) with
the mounting holes on fuel tank and place
the filler neck onto gasket (5)
2.
INSTALL FILLER/BREATHER ASSEMBLY.
CAUTION
Before installing machine screws,
visually inspect that all mounting
holes
are
aligned.
Gasket
misalignment
can
cause
gasket
damage and possible leakage.
a.
Visually inspect that mounting holes in
filler neck (4), gaskets (5 and 7), and fuel
strainer (6) are aligned with mounting
holes in fuel tank.
CAUTION
Do not use metric screws that come
with new fuel tank filler assembly.
Obtain correct machine screws from
the supply system.
b.
Install
machine
screws
(2)
and
lockwashers (3).
c.
Install fuel tank cap (1).
NOTE
FOLLOW-ON-TASKS: Install left access cover per TM 5-3895-373-10.
Close left access door per TM 5-3895-373-10.
END OF TASK
4-30