TM 5-3895-373-20
14.8.
REPLACE/REPAIR BLOWER MOTOR - Continued.
D.
ASSEMBLE - Continued.
2.
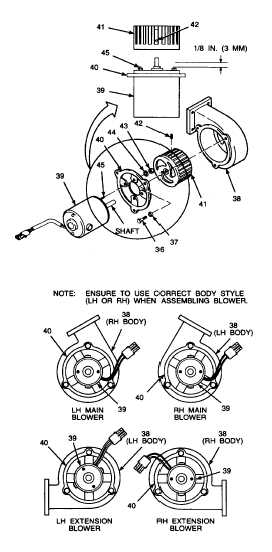
INSTALL FAN ROTOR AND BLOWER
MOTOR INTO BODY.
Hex nuts (43) and machine screws
(45) come with new motor (39).
Before installing motor mounting
plate (40), remove hex nuts and
measure the machine screws. Trim
the machine screws with hacksaw to
4 in. (102 mm) in length so that there
is no interference with the rotation of
fan rotor (41). Ensure that the motor
does not come apart when the hex
nuts are removed. The hex nuts and
machine screws are used to keep the
motor assembled.
a.
Remove hex nuts (43) from machine
screws (45). Measure the machine screw
and trim the length to 4 in. (102 mm) with
hacksaw so there is no interference with
the rotation of fan rotor (41). When
removing hex nuts, make sure that motor
(39) does not separate.
b.
Install motor (39) shaft through motor
mounting plate (40). Use the illustration to
properly orient the motor onto the
mounting plate for each blower being
assembled.
c.
Install lockwashers (44) and hex nuts (43)
onto machine screws (45). Tighten hex
nuts.
Do not slide the fan rotor tight
against the motor. Leave a 1/8 in. (3
mm) gap between the machine
screws and the bottom of the fan
rotor.
d.
Slide fan rotor (41) onto motor (39) shaft.
Ensure that a 1/8 in. (3 mm) gap is
maintained between the fan rotor and
machine screws (45).
e.
Tighten set screws (42).
f.
Install motor (39), motor mounting plate
(40), and fan rotor (41), assembled, into
body (38). Follow the illustration to
properly orient the mounting plate onto the
body for each blower being assembled.
g.
Install lockwashers (37) and hex head cap
screws (36) through motor mounting plate
(40) and into body (38). Tighten cap
screws. Do not overtighten.
GO TO NEXT PAGE
14-68