
(g) Clean out the heater fuel tank.
(h) Clean out the heater; check the igniter tip
and porcelain. Be sure blower fan is tight. Set tips as
outlined in manual. Check and clean out pump. Be sure
the transformer is working.
WARNING: Cover must be over transformer at
all times.
2. Check over all wiring on the tractor, looking for
loose or bare wire. Tighten all connections on:
(a) Relays
(b) Toggle switches
(c) Limit switch on the reverse shifter bar
(d) Depth control limit switches
(e) Manual override switch
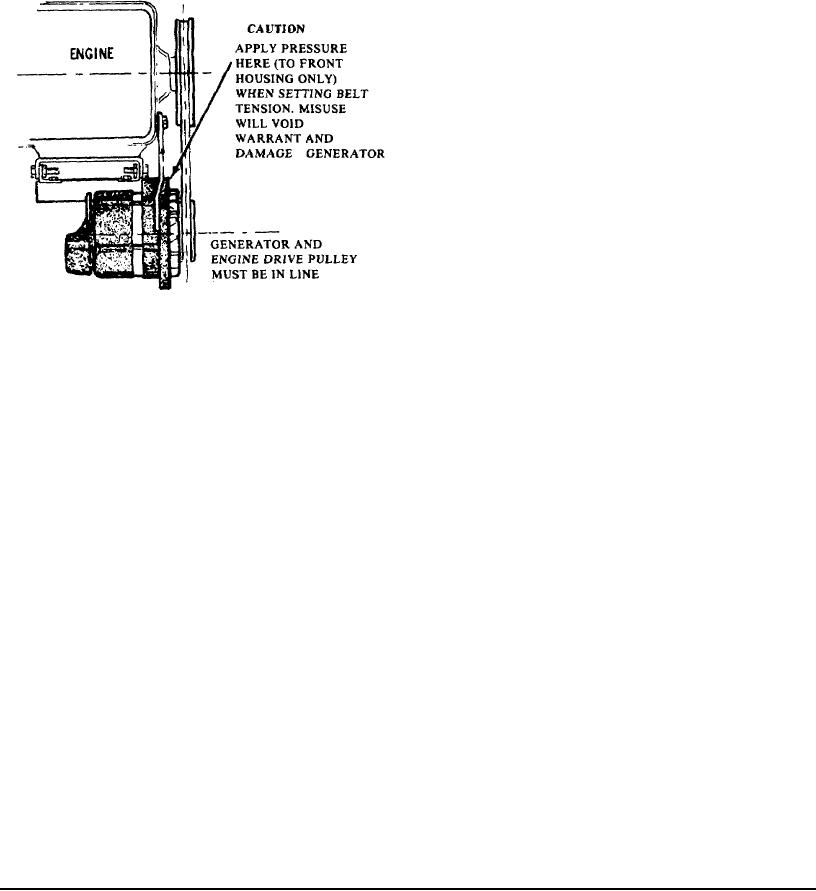
(f) Check the 125 volt generator V-belt drive
and mounting. Check pulley set screws for tightness.
(g) Check the 12 VDC Generator V-belt drive
Correct Alignment of Generator Pulley
and mounting. Check pulley set screws for tightness.
Figure 60
3.
Refer to the engine manufacturer's manual
for all periodic maintenance instructions. Strict compliance
SEASONAL OVERHAUL
with these instructions will help assure steady and efficient
Iowa Manufacturing Company strongly recommends
operation of the vital power plant.
that each paver be given a seasonal overhaul if it has
4. Drain and flush the transmission and transfer
accumulated at least 500 operating hours during that
cases and fill with the correct quantity and type of oil.
season. By so doing the paver owner prepares for the next
5. Check electric clutches - make sure each
season by eliminating many of the potential break-down
clutch is getting the proper amount of current. This should
possibilities in advance.
be a minimum of 11.4 volts when machine is in operation.
The following procedures are recommended for
Make sure all clutch settings are maintained as noted in
conditioning the CEDARAPIDS Paver for the coming
Electric Clutch Paragraphs, this Section.
season.
6. Remove the slat and screw conveyors.
1. Separate the screed from the tractor unit by
(a) The liners for the slat conveyor may need
unbolting the arm at the pivot points, loosen the screed
replacing.
lifting cables and unplug the electric cable at the quick-
(b) If the chain of the slat conveyor is starting
disconnect.
to show wear it may be reversed.
(a) Remove the moldboard from the screed.
(c) Check the conveyor sprockets if they show
(b) Check all holes that allow heat to enter the
excess wear, replace at this time.
moldboard chambers to see that they are open.
(d) Check all the roller bearings and tighten all
(c) Check all Eriez Vibrators for the proper
hold down bolts.
setting. Follow procedure as outlined in Section 7.
(e) The outboard bearing for the screw
(d) Check all wiring and connections to make
conveyor may need replacing.
sure they are not broken or bare. Take care to check the
(f) Hardface the screw conveyor. An extra
heavy crossover cable.
hardfaced screw conveyor should be kept in stock. As the
(e) Check the screed plate thickness and look
one on the machine starts to show wear, it should be
for cracks.
replaced and built back up with hardface.
(f) Disassemble the depth control screws and
socket. Clean out and check for wear and excessive
looseness in these sockets, which could cause a wavy mat.
Page 130