TM 5-3895-373-34
D.
ASSEMBLE - Continued.
3.
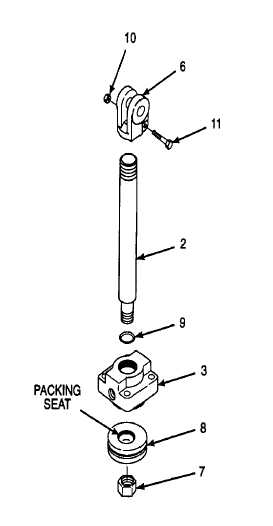
ASSEMBLE PISTON COMPONENTS.
a.
Install and hand tighten clevis (6) onto piston rod
(2). Clevis should have full thread engagement
with piston rod. Install hex head cap screw (11)
and hex nut (10). Tighten hex nut to 26 lb-ft (35
N.m).
WARNING
Hydraulic
oil
can
be
moderately
flammable and can be an irritant to
the
skin,
eyes,
and
respiratory
system. Avoid prolonged exposure.
Eye protection and rubber gloves
must be worn when working with
hydraulic oil.
b.
Lubricate chrome surface of piston rod (2) with
clean hydraulic oil. Rotate and slide cylinder
head (3) onto piston rod.
CAUTION
Be careful not to damage preformed
packing when sliding over threads.
Sharp edges of thread can cut or
damage
preformed
packing.
Damaged
preformed
packing
will
cause
leakage
and
affect
performance.
c.
Install preformed packing (9). Ensure preformed
packing is seated against shoulder on piston rod
(2).
d.
Install piston (8) on piston rod (2). Make sure
packing seat on face of piston slides over
installed preformed packing (9) without pinching.
CAUTION
Do not clamp piston rod against
metal jaws of bench vise. Damage to
chrome surface of piston rod can
result from contact with metal vise
jaws.
e.
Clamp clevis (6) in bench vise.
CAUTION
Make sure preformed packing (9)
does not get pinched between piston
rod (2) and piston (8) when tightening
lock nut (7). Packing will not seal
properly if pinched.
f.
Install and tighten lock nut (7) to 130 lb-ft (176
N•m).
g.
Remove assembled components from bench
vise.
GO TO NEXT PAGE
2-697