
TM 5-3895-385-23-2
0238
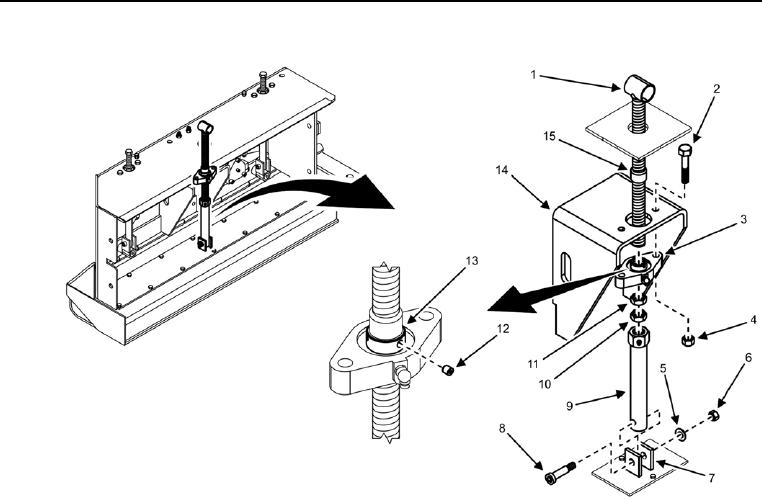
Screed Extension Vertical Attack Angle Adjustment Screw Installation
Figure 2. Screed Extension Vertical Attack Angle Adjustment Screw -- Installation.
1. Install screed extension vertical attack angle adjustment screw (Figure 2, Item 1) into screed extension and
front extension hinge (Figure 2, Item 14).
2. Install flight screw bearing (Figure 2, Item 3) onto screed extension vertical attack angle adjustment screw
(Figure 2, Item 1).
3. Install nut (Figure 2, Item 11) onto screed extension vertical attack angle adjustment screw (Figure 2, Item 1)
until approximately 2 inches (in) (51 millimeters (mm)) of thread is showing below nut (Figure 2, Item 11).
4. Install jam nut (Figure 2, Item 10) onto screed extension vertical attack angle adjustment screw (Figure 2,
Item 1).
5. Install lower screw housing (Figure 2, Item 9) onto screed extension vertical attack angle adjustment screw
(Figure 2, Item 1) by turning clockwise until it reaches jam nut (Figure 2, Item 10).
6. Install two set screws (Figure 2, Item 12) on locking collar (Figure 2, Item 13).
7. Install two bolts (Figure 2, Item 2) and two new locking nuts (Figure 2, Item 4) into front extension hinge
(Figure 2, Item 14) and flight screw bearing (Figure 2, Item 3).
8. Install bolt (Figure 2, Item 8), flat washer (Figure 2, Item 5), and new locking nut (Figure 2, Item 6) into bracket
(Figure 2, Item 7) and screed extension vertical attack angle adjustment screw (Figure 2, Item 1).
9. Turn screed extension vertical attack angle adjustment screw (Figure 2, Item 1) clockwise until stop collar
(Figure 2, Item 15) makes contact with flight screw bearing (Figure 2, Item 3).

